How do I use a checkbox in Microsoft Excel projects?
As you add more efficiency into your daily workflow, you can look to developer tools for even more help.
Developer Tools are an additional tab of the Microsoft Excel ribbon that will give you access to advanced features of the program. These features include Macros, Visual Basic code, and form controls.

Excel Developer Tools – Checkbox Controls – Developer tab
This post is focused on how to use a Checkbox form control in your Microsoft Excel projects. Checkbox controls will help to make your spreadsheets more efficient and a better user experience.
What is a form control?
To answer this question, we need to first understand more about a form.
“A form, whether printed or online, is a document designed with a standard structure and format that makes it easier to capture, organize, and edit information,” according to Microsoft Online.
A form control is an interactive way to work with your data or to use code within an Excel project.
“Controls are objects that display data or make it easier for users to enter or edit data, perform an action, or make a selection. In general, controls make the form easier to use” according to Microsoft Online.

By default, Excel will assign ‘TRUE’ to a linked cell when checked and ‘FALSE’ when a cell is unchecked.
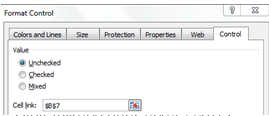
You may also control the initial ‘state’ of a checkbox by choosing unchecked, checked, or mixed.
How does it work?
After you create the checkbox control, it can be linked to a specific cell on a worksheet. When linked, the action of checking or un-checking the box changes the value of the cell you assigned it to.
Let’s try it!
How to assign a checkbox form control to a specific cell
- Click on the ‘Developer’ tab of the Ribbon
- Click on ‘Insert’ and choose the checkbox form control
- Your cursor will change to a crosshair, and you can now click and drag to draw a checkbox control
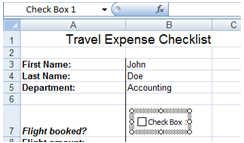
- It is important to note that the checkbox control acts like a graphic object (i.e. image or chart). Therefore, it is resting on top of the cell data and not actually located inside of a cell.
Adjust the width and/or height of the cell you are trying to put the checkbox into. (Again, the checkbox will not actually live inside the checkbox, but only appear that way with formatting and spacing. It is actually placed on top of the cells of the worksheet).
- Select the text that says ‘Check Box’ and change to an appropriate label.
- With the checkbox selected, click on ‘Properties’ from the Developer tab (or you can right-click on the edge of the checkbox control and choose Format control)
Click on the ‘Cell Link’ input box and then click on the appropriate cell that the checkbox control is linked to.
- Click ‘OK’ to close the dialog box.
- Click off of the checkbox control so that you are no longer in edit mode (when the hash marks are going around the outside of the control)
- Now, click on the checkbox. Verify that the word ‘TRUE’ is appearing in the linked cell. Test the checkbox again, by un-checking the box and verify the value of the linked cell goes to ‘FALSE’.
- Save your work.
Now, you have a checkbox linked to a cell and can build out your Excel worksheets to have an experience similar to other common forms.
Practical Application
Checkbox and form controls can change your daily workflow and make you a more efficient Excel user. Many businesses incorporate forms into the Excel projects where data entry is common such as invoices, expense statements, polls, quizzes, and many more.
How can you think to incorporate checkbox controls into your worksheets?
Do you have a project that you could complete more efficiently by setting up a form and form controls?
Need more help?
Get Excel basics here.
Classes at the Digital Workshop Center are offered in Fort Collins, Denver, and online. Fill out the form below or contact us anytime to join one of our regularly scheduled classes or setup a class for your company.


 Adjust the width and/or height of the cell you are trying to put the checkbox into. (Again, the checkbox will not actually live inside the checkbox, but only appear that way with formatting and spacing. It is actually placed on top of the cells of the worksheet).
 Click on the ‘Cell Link’ input box and then click on the appropriate cell that the checkbox control is linked to.