Guide to Creating Custom PowerPoint XML

If the default combinations of PowerPoint Styles, Themes, and Variants do not get you the desired result you need, you may need to edit the XML of a Theme file to create the best outcome.
Editing XML is for advanced users only and requires a text code editor and some manipulation of the Theme files. XML is extremely picky and must be written exact to work. Be very careful when editing XML files and always make backups of your work.
Quick Definitions and Important Notes
Styles: A style is a collection of formatting instructions. You use styles to format the paragraphs in your document. So you would use the “Title” style for your title, “Body Text” style for body text, “Caption” style for the picture captions, and “Heading 1” for the major headings.
Variants: Variants allow you to quickly make changes to colors, fonts, & effects without exiting the current Theme. To apply a different color variation of a particular theme, in the Variants group, pick a variant. If you don’t see any variants, it could be because you’re using a custom theme, an older theme designed for earlier versions of PowerPoint, or because you imported some slides from another presentation with an older or custom theme.
The Variants group appears to the right of the Themes group, and the choices vary depending on the theme you’ve selected.
Creating a Custom Theme with 50 Custom Colors
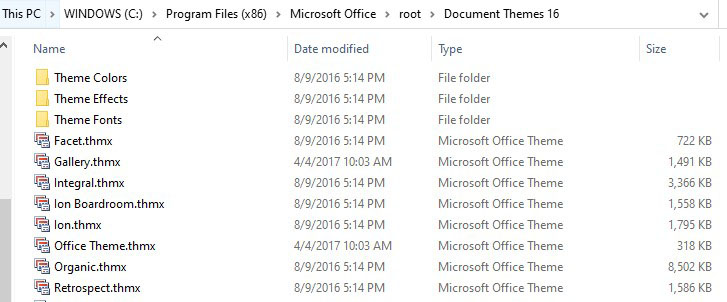
1. In order to properly edit a custom Theme file, you need to locate the default folder on your computer that holds the THMX files.
The path on a PC is: C:\Program Files (x86)\Microsoft Office\root\Document Themes 16
3. In your working folder, rename the copied file to your custom name (e.g. “Vivavi Custom Theme.thmx”
4. Right click on the file and change the file extension to .ZIP
If you do not see the extension you may need to change your view options to show File Extensions.
This step is crucial. It changes the THMX file into XML components for you to be able to edit individually, add additional color codes, etc. We will convert the ZIP back to a THMX file at the end of this process.
5. Now, double-click on the ZIP file and Extract All to your working location.

7. Open the ‘theme’ folder
8. Open the ‘theme’ folder again (yes, there is a theme folder insider a theme folder)
9. Right-Click on ‘theme1.xml’ and open in your text editor. We are using Notepad++, but any text editor should work.

<a:clrScheme name=”Vivavi Custom Theme Name”>
11. On line 4, you can update the name of your Theme’s default color scheme as follows:
<a:clrScheme name=”Vivavi Theme”>
12. Each theme has a default set of colors. You can update the colors with new hex codes, but not the color names unfortunately. You may update the Theme’s default colors starting on line 12, with the following sample code:

These changes will eventually be reflected here:

Note: For the purposes of this exercise, we changed the first 2 values only. You will see duplicate color codes with the custom colors listed below but we wanted to present both options here.
13. Scroll down (or CTRL+F) to find the line that says “<a:extraClrSchemeLst />”
14. After this line, you may paste in XML code for your custom colors. These changes will be reflected in the Theme under the “Custom Colors” section as shown here:

<a:custClrLst>
<a:custClr name=”ABC Purple”>
<a:srgbClr val=”491e88″/>
</a:custClr>
<a:custClr name=”ABC Dark Blue”>
<a:srgbClr val=”0040a6″/>
</a:custClr>
15. Close the ‘theme1.xml’ file
16. Back in your working folder, you need to go back two levels of your directory until you see the root of the Theme files. It should resemble the screen shot below:

17. This step is crucial. Select all of the files and folders in this directory, right-click and choose ‘Send To’ in order to create a new version of the ZIP file we started with. We would recommend that you use a unique name to keep your files organized at this stage.

18. Copy and paste this New theme file into the Themes Folder you started with
19. Right-click to rename and change the file extension back to .THMX. Click ‘OK’ on any warning dialogs you may receive.

20. Double-click on your THMX file to launch a blank new presentation (PPTX) file with the new theme name, default theme colors, and the custom colors included.


21. For future presentations, you should now see your Custom Theme in the list of Custom Theme options. Note that this custom theme is only available on this one device, but this file may be shared with other users.

An alternative method to incorporate your custom theme would be to create a new PowerPoint Template (.POTX) with this theme as the default. This .POTX file will be saved to the default Template folder automatically.
To create a new Presentation (.PPTX) file from your Template file (.POTX), you may click on File > New and choose the Personal tab to see your Personal Template options.

Other Considerations
By creating your own XML file, you may also add your Variants to any Theme. This may not be necessary if you have already set all of your custom colors in the Theme itself using the above techniques.
Adding Variant XML files may give you additional options for those that need more color combinations.
To add your own custom Variants to a Theme, you first open Windows Explorer, ensure that hidden files are visible, and navigate to:
C:\Users\Username\AppData\Roaming\Microsoft\Templates\Document Themes\Theme Colors
Using a text editor like Notepad++, you may create a new file, add your own custom Variant using code as follows, and save as a custom .XML file name.
<?xml version=”1.0″ encoding=”UTF-8″ standalone=”yes”?>
<a:clrScheme xmlns:a=”http://schemas.openxmlformats.org/drawingml/2006/main” name=”Vivavi Custom Variant”>
<a:dk1>
<a:sysClr val=”windowText” lastClr=”000000″/>
</a:dk1>
<a:lt1>
<a:sysClr val=”window” lastClr=”FFFFFF”/>
</a:lt1>
<a:dk2>
<a:srgbClr val=”491e88″/>
</a:dk2>
<a:lt2>
<a:srgbClr val=”0040a6″/>
</a:lt2>
<a:accent1>
<a:srgbClr val=”0070b8″/>
</a:accent1>
<a:accent2>
<a:srgbClr val=”00a9e0″/>
</a:accent2>
<a:accent3>
<a:srgbClr val=”00b0a2″/>
</a:accent3>
<a:accent4>
<a:srgbClr val=”2cb34a”/>
</a:accent4>
<a:accent5>
<a:srgbClr val=”333333″/>
</a:accent5>
<a:accent6>
<a:srgbClr val=”999999″/>
</a:accent6>
<a:hlink>
<a:srgbClr val=”0000FF”/>
</a:hlink>
<a:folHlink>
<a:srgbClr val=”800080″/>
</a:folHlink>
</a:clrScheme>

Summary
Explore a Business Administration Certificate
This is private instruction with a flexible start date. There is no cohort to wait for.
Request program information and an admissions advisor will follow up within one business day to help you choose a start date, set a session schedule, and sort out funding if needed. You can also attend a free info session to meet an instructor and ask questions before committing.
If funding is your first priority, start with the financial aid page. It covers WIOA, DVR, scholarships, employer assistance, and financing options.