Top Five Adobe Captivate Productivity Tips

Adobe Captivate is a robust eLearning development tool. When utilized correctly, developers can create a variety of engaging and interactive eLearning courses. To make the most of this tool, here are five Adobe Captivate productivity tips to get started.
Top Five Adobe Captivate Productivity Tips
1. Customize Your Workspace
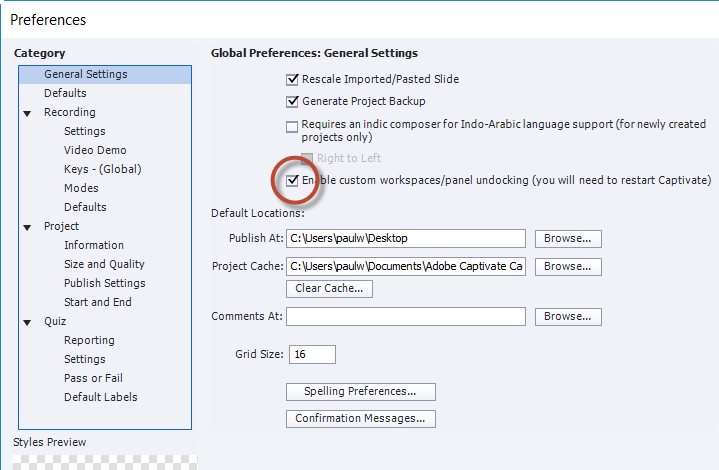
- Go to the ‘Edit’ menu then select ‘Preferences’.
- In General Settings, you will find the ‘Enable custom workspace/panel undocking’ option
- Save your new workspace with a name so that every time you open Captivate you start with it instead of the default workspace
Take advantage of this feature and save yourself time and effort by creating a custom workspace.
2. Keyboard shortcuts
- Control+Shift+C : Create new text caption
- Control+ D : Duplicate object
- Control+Shift+V : Insert video
- Control+Shift M : Insert Image
- Control+Alt+T : Show or hide the timeline
- Control+S : Save Project
3. Photoshop Round Tripping
4. Asset Sizing
Photos: Stock images downloaded from websites such as UnSplash or Fotolia are typically huge files. If you try to import these images as-it-is in Captivate, it will bloat your project. So, it’s better to use a photo editing tool such as Adobe Photoshop to edit the image size first.
Audio: Importing audio files in the MP3 format is the preferred format to decrease the size of the audio file compared to the WAV format.
Videos: Use video editing tools to optimize videos before importing them to your Captivate project. This avoids resizing the video after importing, quality issues, and loading issues. Adobe Media Encoder is a popular tool used to optimize learning videos for Captivate but there are many out there. Streaming videos from an external server and embedding them in the course also reduces course loading time.
It’s a Captivate best practice to keep assets as small as possible to optimize file sizes before uploading them in your projects.


