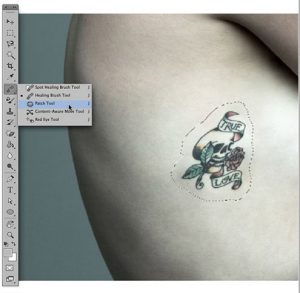
Breaking down the 4 most commonly used Photoshop re-touch tools
 The re-touch tools in Adobe Photoshop can help you to quickly remove any blemish in a photo or design. By understanding the tools a bit more, we can help you decide which is the right tool to fix the issue.
Spot Healing Brush Tool
Sometimes in Photoshop, we can experience a bit of Photoshop “magic” and we drool in amazement. Dig a little deeper, and you will see that there is some crafty concepts behind what may appear like magic.
Using the Spot Healing Brush tool, you can quickly fix blemishes and mistakes on a photo. This works well for correcting a photo mistake, smooth wrinkles, eliminating an unwanted mark and much more.
 The concept of “healing” in this tool is more clearly understood when you realize that Photoshop takes a brush concept, and allows you to paint over the blemished area. Depending on the size of the brush used, Photoshop will examine the texture, shading, and more around the area you are painting on. As you stop painting, Photoshop does its best to analyze and match the affected area so that it blends in as best as possible.
In my experiences, Spot Healing Brush Tool works best for fixing small blemished areas. It’s also best when the “good” pixels are not damaged in any way, so that this healing process can take place more easily. As the area gets larger, I might look to use the Healing Brush or Patch tool instead.
Healing Brush Tool
 The Healing Brush is very similar to the Spot Healing Brush tool. Both will use this concept of “healing” to try and fix blemishes by using the surrounding pixels and blending the good with the bad.
The difference (and advantage) of healing brush is that you can control the target source of the “good” pixels, and then “heal” them to the destination. In other words, you need to Alt-click with the Healing Brush and set the target. An adjustable brush size and characteristics will help you to control the source area.
Then, you apply the source pixels to the destination in one fluid motion. With greater control of the target area, you don’t have to rely solely on the surrounding pixels around the blemish. Instead, you can decide what are the best pixels to help you make the healing process happen more easily.
Patch Tool
 When the area you “heal” becomes non-uniform, and a freehand selection is more appropriate, then the Patch tool becomes the right option for the job. With the Patch tool you can draw your freehand selection (similar to the lasso tool), and then decide how to move that selection to a source where you can begin the same healing process as above.
While I personally use the Patch tool less than the others, it certainly has its purpose when a brush size or shape just won’t do what I need.
Clone Stamp Tool
The last of the four major re-touching tools is the Clone Stamp. When you need a one-to-one clone of pixels from the source to the destination, then this tool is perfect.
In a similar process to Healing Brush, you need to choose an adjustable brush and Alt-Click to set the target source of the pixels to get started. Then, you can clone the source to a destination in one fluid motion. The Clone Stamp is perfect for covering up mistakes with an exact match.
For example, if you wanted to remove graffiti on a brick wall, the Clone Stamp would be a great tool to use to clone the good bricks and place over top of the affected bricks.
Summary
There may not be one perfect tool to create the re-touching magic you need and fix a photo the right way. However, some combination of the four tools above is a good start. As you refine your re-touch process, you will find that you have tremendous control over the final product and your professional-looking photos will make you stand out in a crowd.
Want to learn more about Adobe Photoshop and re-touch tools?
Fill out the following form to schedule a free consultation and learn more about DWC live or online classes.
"*" indicates required fields

