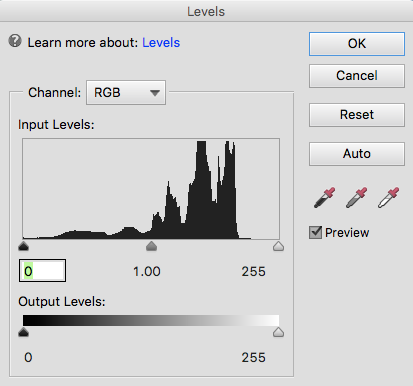
Last time we discussed how to read a histogram, and how this ability can help you become a more savvy photographer, both behind the lens and in front of the computer. Now it’s time to take it a step further, and explore how you can use your newfound knowledge to tinker with the Levels tool in Photoshop. Remember, that this map is the key to understanding the range of tonalities in any given image, and that it can be played with to alter your white point, black point, and midrange tones. It may seem simple, but altering your histogram layout can have a pretty dramatic effect on your photos!

So, using a sample image that we looked at last time, let’s dig right in! Pulling up the Levels tool, we can see that the histogram is heavy on midtones, and has very little on either extreme end. Hopefully, just looking at the image, you can observe this as well. You’ll see that our range goes from 0 (black point) to 255 (white point), with a midpoint set at 1.0, and our output sliders are in position at 0 and 255 respectively. First, let’s explore what happens when I change the black point of my image, by moving the slider to the right (towards the middle).

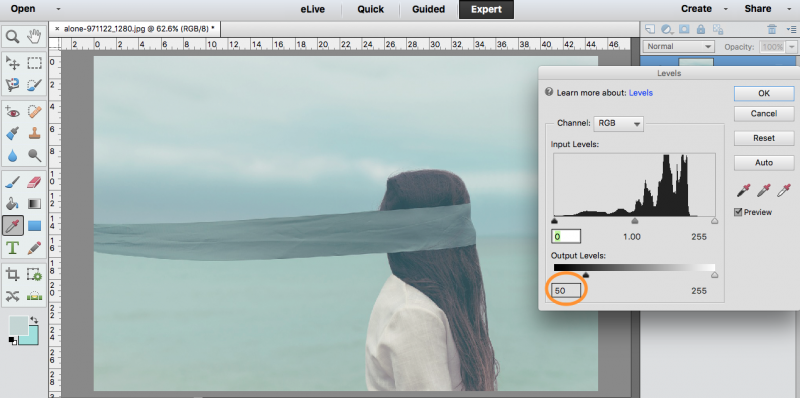
Moving from a black point of 0 to 50, you can see that the darker tones in the image got even darker. That’s because this function is telling the program to shift the amount of pixels that are included in the “dark zone”, and from our histogram, you can see that I set my black point in an area where there are plenty of pixels to the left of it, kind of right in the middle of that first plateau on the graph. Now, keep in mind that this is a totally different function from simply making the image darker- we’ll get to that in a moment.
I’m sure you can imagine what will happen when we move our white point inwards next (after putting our black point back to 0). For consistency’s sake, I’ll move it by a factor of 50.

Our highlights just got much more dramatic, and the overall brightness increased. This is due to the great number of pixels that we have in this area of the histogram, where our new white point is set right in the middle of the far right spike. And now, just for fun, let’s combine these two actions- moving both our black and white points inward by 50 points.

As you can see, this function of the Levels tool is the essence behind any action you take to alter your contrast. This method gives you fine control to make your contrast as shallow or deep as you’d like. Depending on your individual image, each point’s value will have a different effect, because of the unique tonalities present.
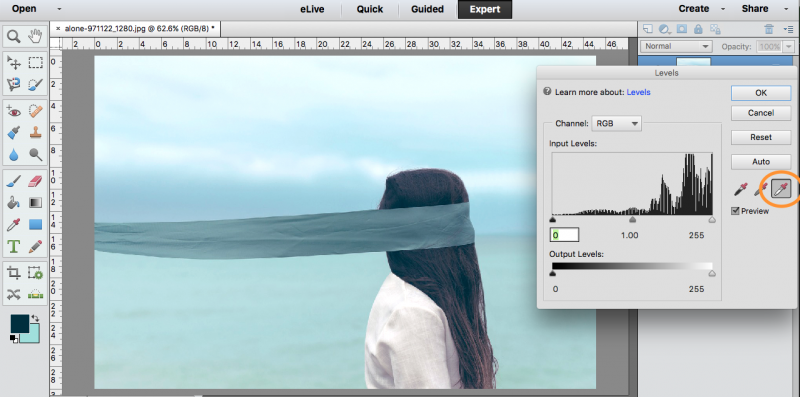
So now, let’s explore a different way to go about setting your points in Levels- using the manual dropper tools. You’ll see these three options on the left side of the Levels box; there’s one for black, gray, and white, and they do exactly as you might imagine- manually set your black, grey, and white points for your image. These are generally harder to master, come with more dramatic effects, and typically chop out pixels in the process. But for the sake of this tutorial, let’s try to set a new black point. I’ll click on the dropper, and I’ll say that in this woman’s hair, I think the darker area should serve as my new black point, so I click right near the nape of her neck.

What a big difference! The interesting thing about using this tool is that it takes into account colors as well, and automatically adjusts that precise point you clicked on to be neutral black- equal parts cool and warm tones. Since our image is strongly cool-colored, this action shifted it to a warmer state.
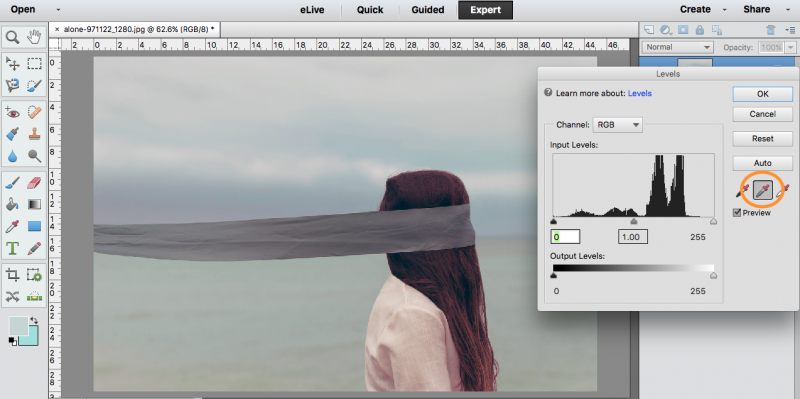
Now let’s try to set a new white point, which I think will lie on her shirt, right behind her armpit area. I’ll click on my white dropper tool and click on that spot on the image.
This made things much brighter, but didn’t change the color as much, since the shirt was slightly warm-colored to begin with. Now, let’s try to set a new gray point- this will be a spot in your image that you think should be a neutral gray color (handy when shooting things like architecture, roads, etc…). For the purposes of this tutorial, I will pick a spot way up in the clouds, even though I know they are quite cool-colored. Can you guess what will happen to the image when I alter the gray point this way?
That’s right- the whole image became warmer, to adjust to the new middle neutral point in the clouds, which you can see is now a perfect neutral gray. Levels is a great tool to play around with when you feel like you’ve gotten a color cast in your image, or you feel like the lighting was off during shooting. It’s very hard to get a perfectly neutral lighting situation, so it’s nice to be able to adjust this in Levels during the editing phase!
To round out this tutorial, let’s quickly explore the output sliders that lie underneath the histogram. These tell the program how much of each extreme (dark and light) to allow in the image at any given time. They are always set to the far ends, to let in all the pixels that you captured when you were shooting. So let’s move the shadow output slider to the right, essentially saying we don’t want so much darkness to be allowed in.
This simply made the image brighter and more washed out, since we removed much of the shadow without further adjusting the contrast. Now let’s try the same thing with the highlight slider.

As you guessed, this made the image darker and sort of muddy, thanks to the low contrast. You may not need to play with the output as much, except when you are doing fine detail work, but it’s good to know how it works!
There is quite a lot you can accomplish with the simple adjustments in the Photoshop Levels tool, and it should be one of your first stops when editing images in a pro or semi-pro setting. And if you really want to master this tool, and many others, to make your photos really stand out, check out our digital photography classes and Adobe Photoshop classes!
Fill out the form below to tell us more about how we can help you get started!
You can also call our office at 970-980-8091